Key: Black writing represents process Violet writing represents the conceptual thinking
Blue represents additions based on extending the experience
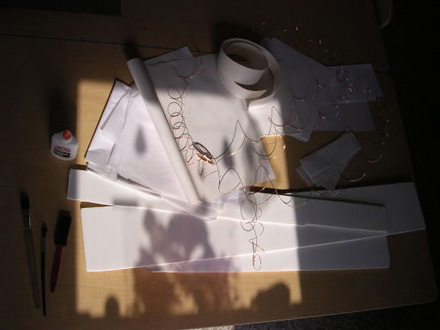
I chose these materials because I haven’t really worked much with wire and wanted to explore with it. I set up the materials on the table in the art studio at our school in the morning.
There was a lot of sun coming in the windows and I was struck by how the different shades of white looked in the sun as I laid them down on the table. I held them up to the light and looked at them as I did it.
I decided to take some glue and different shades of white paper and tissue paper and layer them. I tore them with my hands at first and brushed the glue on in-between the layers, holding each layer up to the window as I went. I liked seeing the difference between the kinds of paper.
I saw more light coming through the thinner sheets of paper and it was more opaque with heavier paper. When I had them on the table, it looked like an all white collage but when I held it up to the window, it looked like several different shades of white. The light wasn’t able to go through the heavier paper so it looked darker. I think a child would notice how the light goes through the paper. I would ask them why this part here (thin paper) seems so much lighter than this part (opaque heavy paper)?
I decided I needed scissors and ended up cutting tissue into small rectangles and layering all the same paper together. Even though it was the same kind of paper, there were still differences in the translucency of it as more was added.
The largest pieces were probably 3 by 5 inches and the smallest pieces were about 1 by 3 inches. I decided to use tissue paper because as I layered the paper, I liked how the layers built on each other to form a translucent pattern. The more I put on, the more intricate the pattern seemed. I didn’t want to try another paper because I had already done that with the torn paper where I used several different kinds. I liked how it felt in my hands as I was gluing it too.
When I tried to brush the glue on, it worked well if I was careful. With the tissue paper, it sometimes tore and I felt frustrated. I didn’t want it to tear. I decided to just squirt the glue on and use my fingers to smear it around. I went to wash the glue out of the brush and it was pretty gummy and I had a hard time cleaning the brush. I wondered what brushes were best to spread glue with. Maybe a foam one would have been better than one with bristles.
I followed up on this today when I was at school with a foam brush. It actually was more difficult to use than the bristled paint brush. The tissue stuck to the foam and I had to peel it off. The foam brush cleaned up more easily but I liked the other brush better.
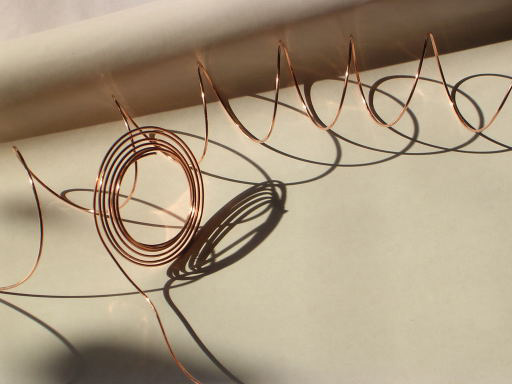
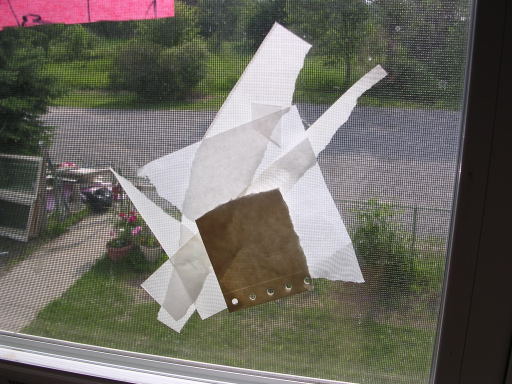
When I opened the package of copper wire, it fell out on the floor like a spring, bouncing all over the linoleum. It made me laugh and I picked it up and let it bounce up and down like a Slinky toy. I liked the weight of the wire and how it felt in my hands. I wondered how long it would stretch so I wrapped it around a chair leg and walked into the kitchen and reading room. When I stretched it out so far, it didn’t spring back into a coil and I had a long curly piece of wire to take back to the art studio. I laid it down on the table and saw the shadow the curls made on the white paper. I thought about tracing them but then I noticed that the computer paper (the old kind with the perforated sides) had interesting shadows with the light coming through its holes. I just looked at their shadows for a while and enjoyed them. I was surprised at how much light added to this experience. I thought it could actually be counted as one of the materials in this exploration.
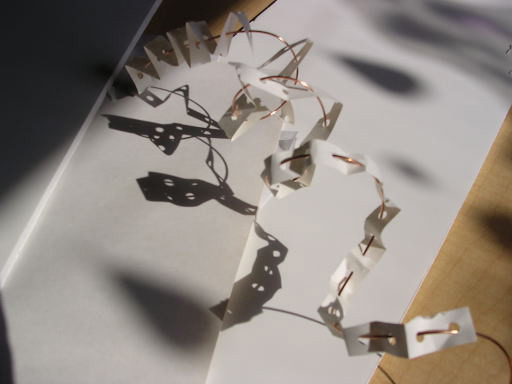
I tore the edge off of one sheet of computer paper and pushed the copper wire through the holes. First, I threaded one hole at a time and then I did every other hole, folding it in accordion folds as I went. This also made interesting shadows on the table. (See computer paper picture) I decided I needed wire cutters to cut off a piece of wire from the long piece. As I used them and saw how easily they cut the copper, I wondered why I had never used them with the children. Maybe I was afraid they would hurt themselves. I want to try wire cutters with them this fall and see how they do. I didn’t feel they were too dangerous when I used them.
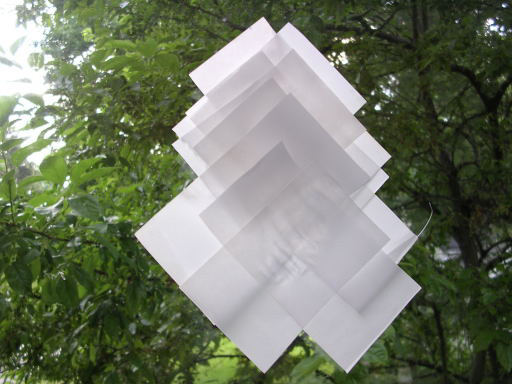
I took the foam core scraps and tried to see if they would bend. I was interested in seeing how they would bend with the paper outside and foam inside. It felt sturdy, like I could build something with it. I found it challenging to bend because it wouldn’t bend in a straight line, no matter how slowly and carefully I tried. When I cut it, it didn’t cut smoothly. I wondered if other people liked to use foam core as I hadn’t used it before and found it difficult. I ended up getting an Exacto knife but even then I didn’t like how it cut. I held it up to the window and bent it all different ways. I found I could build a U shaped frame that stuck out from the window. I decided to get some tape and tape it to the window frame. Then I poked the computer paper and wire sculpture into it and hung it. I liked how that looked. I picked up the cut layers of tissue paper and taped them to another piece of wire and hung it in the middle. I hung it like a spiral and used a bit of each kind of paper to glue to it. I wrapped tissue paper around it like insulation and then cut and wrapped another piece of copper wire around that. I hung little rectangles of all different papers from the spirals. I fringed some heavy tagboard with scissors and cut very small, long, skinny rectangles with other papers.
For a bit, I thought that for this assignment, I should make “something” out of what I had before me, something that I could keep or show someone. But, I didn’t really feel ready to as I was just enjoying exploring the materials first of all. I thought about how teachers sometimes rush children into “making” projects. I thought about what it is like when a teacher has an idea that children should use a variety of art materials in a project and children don’t use them all. I remembered a puppet making project where children used mostly buttons and socks, not all the felt, yarn and other things I had laid out and I was disappointed. I had an “aha” sort of moment where I realized that just using one material and really exploring it was enough. I developed a respect for the way children approach materials. I thought about my teaching and resolved to go slower and let children explore as they wish. I wondered how many materials should be presented at once so that it is not too little and not too much.
I also thought about times this year when the children just seemed to be playing with a material such as glue and my teacher’s aide was frustrated because the children weren’t “learning” how to use it “correctly”. During the year, he was often upset because the children weren’t making as much “representational” art, such as drawing recognizable people/houses/etc., as he thought they should be. I thought about how long I wanted to play with the materials and I didn’t get around to representing anything concrete and I am an adult. I thought about ways I could talk with my aide about this and maybe encourage him to take some time to just explore the materials by himself so he could see it from a child’s perspective.
Overall Thinking about Concepts in this Panel
I think the concepts of “opaque” and “translucent” could be talked about but they are not exactly opposites. Opaque and transparent would be the opposite but I am not looking at transparency in this activity. The concepts of “darkness” and “light” are others. Thinking about movement of light, I think of asking if light moves and if so, how it stops. I think about “reflection” and “absorption” of light as well.
Possible Extensions
Other materials could be things like waxed paper, cardboard and plastic bubble wrap, even colored plastic wrap or acetate. They could layer them and see how the light shines through them. Flashlights could be used by individual children. Even using their bodies in front of the light or using a shadow screen helps them understand light and how it works. I think of an activity where the children used small pieces of feathers, fruit, fabric, etc. and put them inside small slides we projected on the wall. The children looked at the table at the bowls of raspberries, for example, and then at the projected raspberries and talked a lot about how they saw it change in the light.