
Up to this point, we've discussed a number of ways to modify the format of our web pages. These include:
There are, however, a few disadvantages of relying on these methods to modify our pages.
The W3C proposed style sheets in 1996, and although their recommendation has not yet been realized fully, cascading style sheets do offer solutions to the problems listed above. The primary benefits of style sheets allow the designer to:
Let's see what style sheets can do for us by running a few examples.
A style sheet is simply a block of text, contain either within the HTML file itself or within a separate file. Within the style sheet are a list of rules defining how the designer wanted browser to display certain components of the web page. The general structure of a rule is:
tag {property: value; property: value; ... property: value}
For example, the designer can redefine how any text between the heading 1 tags, <h1>, will be displayed. Assume we wish to display heading 1 text in blue with an Arial font at size 37 pixels. The rule for this would be:
h1 {color: blue; font-size: 37px; font-family: arial}
h1 is the tag (notice that it is entered without the "<" and ">" brackets), and between the curly brackets are pairs of rules, "color" is to be set to "blue" (the #rrggbb format can also be used), font size is to be 37 pixels high (px stands for pixels and pt is points), and the font type or family is to be Arial. If a second rule is to be defined, simply place it on the next line.
h1 {color: blue; font-size: 37px; font-family: arial}

  p {color: blue; font-family: impact}
code {text-indent: 1cm; background: #ccffcc; font-family: courier;
  color: green}
This new rule will force paragraphs to be displayed in blue using font Impact. Any text between <code> tags will have an indent of 1 centimeter, a green Courier font, and be placed on a light green background (#ccffcc).
Many of the property values have units associated with them. Below you should see a table of some of the more common units and the abbreviations used to represent them.
| Units | Abbreviation |
| pixels | px |
| points (1/72 of an inch) | pt |
| pica (1/6 of an inch) | pc |
| inches | in |
| millimeters | mm |
| centimeters | cm |
| percentage | % |
To get a comprehensive list of the units of the values (e.g., px=pixels) a list of the text related style properties, see DevGuru.com's CSS2 Quick Reference. Brian Wilson also has a nice index of CSS properties.
There are three ways to assign the rules of a cascading style sheet to your HTML file:
The remaining sections of this document will discuss how each of these types is used.
Either using the HTML view of Dreamweaver or using a text editor of your choice, create the HTML file below:
<html>
<head>

  <title>Stylesheet Exercise 1</title>
</head>
<body>
<h1>Stylesheets Exercise 1</h1>
<p> This string of text is contained between paragraph tags. (<p>
and </p>)</p>
<code>This string of text is contained between code tags. (<code>
and </code>)</code>
</body>
</html>
Displaying this in your browser should result in a plain web page that is a victim of the defaults of the HTML browser.
Stylesheets Exercise 1This string of text is contained between paragraph tags. (<p> and </p>) This string of text is contained between
code tags. (<code> and </code>)
|
Each of us should be able to spice this up using font, bold, italics or other tags, but let's see how to do it using style sheets.
Embedded style sheets are added to a single document by adding code to the page's head. When a style sheet is embedded in an HTML file, it is placed between the begin tag:
<style type="text/css">
and the ending tag:
</style>
This tag tells browsers that support style sheets where the style sheet information will be placed. Browsers that do not support style sheets will (hopefully) ignore this text. The attribute type defines the format of the cascading style sheets to be used. For our purposes, the type is to be set to "text/css".
Between the style tags is the code that defines the style sheet. To get browsers that don't support style sheets to ignore the code, the style sheet definition is placed inside of comment tags <!-- and -->. Below is an example where I've placed the rules developed in the previous section within the <style> tags to create an embedded style sheet.
     <style type="text/css">

    <!--

        h1 {color: blue; font-size: 37px;
font-family: arial}

        p {color: blue; font-family: impact}

        code {text-indent: 1cm; background:
#ccffcc; font-family: courier; color: green}

    -->
</style>
Place the embedded style sheet above into the head of the HTML page you entered in the text editor. Viewing it in a browser should result in:
Doing It On Your OwnNow, create an HTML page named exer1.html with an embedded style sheet with the following properties:
Be sure to add atleast one paragraph and one heading 1 to the file in order to test your code. |
There is a second way for the HTML web pages themselves to contain style rules: in-line styles. This allows the designer to change the style for a single instance of a tag. For example, if you have three paragraphs and you only want to change the style on the second one, in-line style rules will do this.
This is done by using the attribute "style" within the tag to define
the rules. For example, to change the style of a single paragraph, then add
the attribute style= "property: value" to the <P>
tag. To try this out, use your text editor to add the following HTML code after
the first paragraph in the first exercise of this lesson.
<p style="color: red; font-size: 24pt"> This is a new
  string of text contained

  in paragraph tags. This one, however, uses an in-line style tag.</p>

  <p>This paragraph should return to the old style.</p>
This in-line style attribute sets the color to red and the font-size to 24 point. Below is an image that shows what your new HTML file should look like.
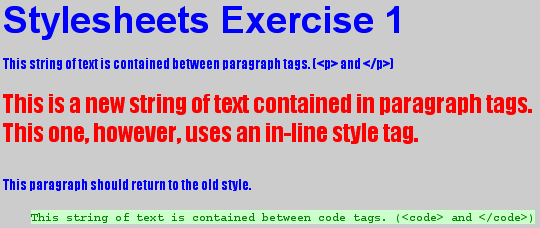
Notice how only the line with the in-line style rules changed. As soon as the paragraph ended with the closing tag </p>, the style went back to the one defined in the head of the HTML document.
Doing It On Your OwnCopy your previous exercise (exer1.html) to a file named exer2.html. Add an additional paragraph that you can change the properties of using an in-line style rule. Set the new paragraph to be displayed in italics using the rule font-style: italic. |
In order to maintain a common look and feel across all of the pages on the site you are designing, it is best to create a single set of style rules and have all the pages access that single file. In this case, you will create a separate text file that contains the rules. They will take on the same syntax as the embedded style sheet rules that were placed between the comment tags. For example, the first exercise you did had the following rules:
h1 {color: blue; font-size: 37px; font-family: arial}

  p {color: blue; font-family: impact}

  code {text-indent: 1cm; background: #ccffcc; font-family: courier; color: green}
Place this text in a file by itself, and you have created an external style sheet file. It is important to note that just as HTML files are recognized with the file extension .html or .htm, external style sheet files must also have their own extension. The common file extension for style sheets is .css.
Assume we have saved this style sheet as exer3.css. Now, let's see how to incorporate this style sheet into a web page.
The tag for an external style replaces the <style>...</style> tags in the head section of the web page. The new tag creates a link to the style sheet. Its format is:
<link rel="stylesheet" href="exer3.css" type="text/css">
As far as you are concerned, the only item in this tag that you need to be concerned with is the href link indicating the name and location of your external style sheet file.
Doing It On Your OwnCopy your previous exercise (exer2.html) to a file named exer3.html. Copy the rules defined as an embedded style sheet to an external style sheet named exer3.css. After copying the rules, delete them from the exer3.html file. Lastly, add the <link> tag to exer3.html to use the external style sheet exer3.css instead of using an embedded style sheet. |
There is a second (less popular and not recommended) method to retrieve
style rules from an external style sheet file. It is called "importing"
and it works like a combination of embedded style sheets and linking. It replaces
the rules of an embedded style sheet with the text @import url(exer3.css);.
An example is shown below:
<html>
<head>
<style type="text/css">
<!--
@import url(exer3.css);
-->
</style></head>
<body>
<h1>Stylesheets Exercise 1</h1>
<p> This string of text is contained between paragraph tags. (<p>
and </p>)</p>
<code>This string of text is contained between code tags. (<code>
and </code>)</code>
</body>
</html>
The beauty of this method is that you may also add additional style rules after the import command.
Inheritance defines what happens when more than one style rule tries to set the characteristics of the same tag. For example, what happens when two different rules try to change the color of the text defined with a <p> tag? This may be due to multiple definitions or possibly an in-line definition that is meant to override an embedded or external style sheet. In other words, there might be an external style sheet that defines the properties of all pages on a particular site, then within a web page on that site, there might also be an embedded style sheet that changes some characteristics just for that page. To take this example even further, on a particular line of the HTML code in the page with an embedded style sheet, there might be an in-line style rule that changes the style for just that line of text. Inheritance tells us how the browser resolves the winner?
Inheritance may also be a problem when tags are embedded inside other tags. For example, what happens if you embedded the <code> tags inside of a paragraph defined with <p> tags? Should the formatting match the <code> tag or the <p> tag?
The following rules apply to inheritance and the browser checks them in order:
First, the more specific rule overrides the more general rule. For example, <code> is more specific than <p>, therefore, any <code> tag within a paragraph will follow the code rules. As another example, the bold <b> or italics <i> tags are more specific than the heading tags, and therefore, their style sheet rules would take precedence..
Second, if two rules cannot be resolved using the first step, the most recently defined rule overrides any older rules. For example, if the style of the <p> tag is defined multiple times, the most recent definition will apply. Therefore, in-line rules will always take precedence because they have been defined most recently. Second would come embedded, and external would be last.
Doing It On Your OwnAs an exercise, create the following web page with embedded style sheet and name it exer4.html. (You can simply highlight the page from this document and copy/paste it to a blank file.) Once you've done this, answer the following two questions by typing the answers as paragraphs into the file.
|
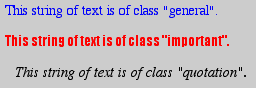
Okay, so what if you have two or three different types of paragraphs you would like to include in your HTML document. For example, paragraphs in general should have one format, but you'd also like to have a type of paragraph with a font to imply an important notice and maybe a third that is indented to represent a quoted block of material. You can create a different style for each one while still using the paragraph tags to define the text. We do this with the class attribute.
There are two steps we need to take in order to define multiple classes of styles. First, we need to distinguish the rules of one class from the rules of another. To do this, in the rule, follow the tag name with a period and the class name. For example, if we wanted to create a class "general" for the <p> tag, we would have to have a style rule that started like this:
p.general {property: value; property: value}
The second step is to identify within the HTML document which class is being used. This is done by adding the attribute class to the tag that the class belongs to. To continue our example, if we wanted to create a paragraph with the class we defined as "general" we would use the following tag:
<p class="general">This string of text is of the class
  "general".</p>
Below is a full example using classes.
<html>

  <head>

  <title>Stylesheet Exercise 4</title>

  <style type="text/css">

  <!--

  p.general {color: blue}

  p.important {color: red; font-family: impact}

  p.quotation {color: black; font-style: italic; margin-left: 10px}

  -->

  </style>

  </head>

  <body>

  <p class="general">This string of text is of class "general".</p>

  <p class="important">This string of text is of class "important".</p>

  <p class="quotation">This string of text is of class "quotation".</p>

  </body>

  </html>
Displaying this example in a browser should result in something like this:
Just because you use class selectors does not mean that all of your tag rules must have the class defined. For example, if you've defined the classes "general", "important", and "quotation" for the <p> tag, you can still have a rule P {property: value; property: value}.
Doing It On Your OwnCopy your exercise exer1.html to a file named exer5.html. Remember, this was the first exercise where you created an embedded style sheet. In this exercise, you will need to create three paragraphs, each of which will use a different class. The classes are as follows:
Create the style sheet rules for these three classes of paragraphs using embedded style sheets and set each of your three paragraphs to one of the classes in order to test your code. |
You may also wish to set a tag style only when it is embedded within another tag. For example, if you only want to change how the <b> tag affects the display of bold text within a paragraph, but no where else, use the following style rule:
p b {property: value}
The first definition of cascading style sheets included two more "selectors" in terms of defining different styles within a single tag. For example, some documents make the first character of a paragraph bold or fancy in some way. Cascading style sheets allow the designer to define the style of a first paragraph character or line. This is done similarly to the way a class or contextual selector is defined, but with a predefined class name.
P:first-letter {font-size: 300%; color: red}
This would make the first character 3 times the size of the other characters and red.
It is important to note that several pseudo elements can be combined. For example, the rule below is perfectly legal.
p.custom:first-letter {font-size: 300%; color: red}
Doing It On Your OwnCopy your first exercise exer1.html to a file named exer6.html. Add a rule to change the first letter only of a paragraph so that it is twice as large as the rest of the paragraph's characters, its font-style is set to italic, its font-weight is set to bold, and its color is set to "#660000". Note: I had better luck getting this to display properly in Internet Explorer. |
<div> -- The begin tag <div> and the end tag </div> can be used to set the style for a block of HTML code. This block usually covers a larger area of code possibly with multiple tags.
<span> -- The begin tag <span> and the end tag </span> can be used to set the style of an HTML element embedded within other HTML tags. It is usually used for very short sections of code. For example:
<p>This part of the paragraph will use the paragraph attributes.
        <span style="color: red; font-style: italics"> This text
        within the paragraph will be red and italicized.</span> This part
        of the paragraph will return to the old paragraph style.</p>
The next two tags are also new with style sheets and can be used to represent edited text within an HTML document. It sometimes is nice to use these tags if a number of people are working on a single document and wish to see the items that were changed from one revision to the next.
<del> -- Represents deleted text. As a style, the property: value
text-decoration: line-through works very well.
<ins> -- Represents inserted text.
Both Webmonkey and Devguru have good tutorials on style sheets.
Copyright 2002 by David Tarnoff. All rights reserved.