Basic FTP Instructions Using WS_FTP
The following instructions should take the student through the steps
necessary to upload or download files using the File Transfer Protocol (FTP)
with the MS Windows program WS_FTP.
Logging on using WS_FTP
- From your Start menu, select
Programs->Internet Tools->WS_FTP->WS_FTP.
(Note: the exact wording of your menu items may differ from this.)
After the program opens, you should see a window much like the one
shown below
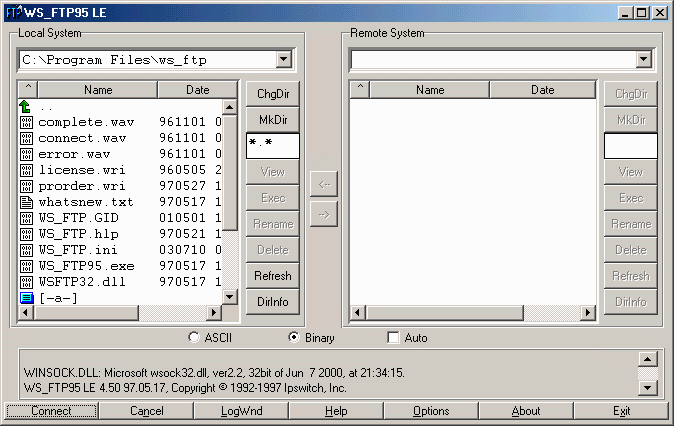
The left half of the window lists the files that are contained on the
machine you are sitting at. The right half of the window lists the
files of the remote server that you are communicating with.
- Click on the button labeled "Connect". It should appear
in the lower left corner of the window.
- After clicking on the button, a small login window should appear
like the one shown below.
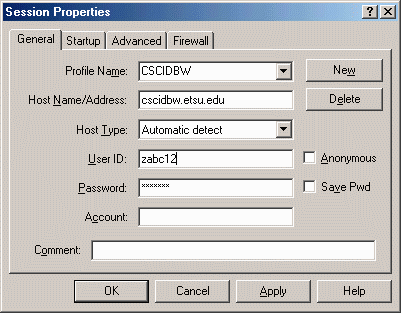
- Verify that the tab name "General" is selected.
- The profile name is of no importance to logging into the remote machine. It
simply identifies a locally saved profile of the computer to which you are trying
to connect. If you wish, you may scroll through the list of profiles to see if
the computer you wish to log onto has already been defined on your computer. The
name would probably be something like "CSCIDBW". Once you select one of
the profiles, notice that the parameters in the windows below the profile name will
change to match the details of the computer you would log onto.
- If the profile "CSCIDBW" does not exist, we will have to define a
profile for it. Begin by changing the hostname to cscidbw.etsu.edu. This is the
name of the server that we wish to upload to.
- Make sure the Anonymous and Save Pwd checkboxes are unchecked.
- Enter your ETSU userid and password. In the majority of cases, the userid will
be z???## where ??? is your initials. (z-account)
- When you click OK, the login window should disappear, and if everything went
well, the files of the remote server should appear in the right side of the WS_FTP window.
Understanding the file listings in WS_FTP
Both the local computer's and the remote server's file systems are accessible
through the WS_FTP interface. As stated earlier, the left half of the WS_FTP
window lists the files that are contained on the local computer and the right
half of the window lists the files of the remote server. The methods for
navigating through either file system are as follows:
-
To select a file: simply click on the file name once
to highlight it. In order to highlight a block of files, click on the top
file of the block, then while holding down the shift key, click on the bottom
file of the block. In order to highlight individual files, click on the first
file to select, then hold the CTRL key down while clicking on subsequent files.
Folders may be selected this way too.
-
To change drives: scroll to the bottom of the list
where you will find a list of the drives in the file system. Click on the
drive that you wish to navigate.
-
To navigate "down" into a folder: double-click
on the folder.
-
To navigate "up/out" of a folder: double-click on
the icon
 located at the top of the list.
Exchanging files using WS_FTP
Use the following process to either move files from the local machine to the remote server
or vice versa.
- Immediately beneath the windows listing the files on the local and
remote machines, you should see two radio buttons, one labeled "ASCII" and
the other labeled "Binary". These buttons should be set based on the type of file
being transferred. If you are moving HTML text files, select the "ASCII"
button. Most other files (typically images and multimedia) should have the
"Binary" button selected.
- Once again, the left side of your screen contains the files on your
local machine. The right side contains the files on the server. If you
want to move files from the local machine to the remote server, highlight the
files you want to move from the left window, then click on the button with the
text "-->". This will move the selected files to the folder that
is currently being displayed on the remote server side of the window.
- If you want to move files from the remote server to the local machine, highlight the
files you want to move from the right window, then click on the button with the
text "<--". This will move the selected files to the folder that
is currently being displayed on the local machine side of the window.
Viewing your files on your browser
For this class, the server we are using will be the cscidbw.etsu.edu server.
This server provides http service to the web, so any files you upload to your
directory will be available over the Internet from anywhere in the world. Simply
use the URL:
http://cscidbw.etsu.edu/userid/filename
where userid is your z-account userid and filename is the name of the file you
uploaded. (Don't forget to add the file extension.) If you put the file in a
subdirectory/folder, put the folder path after your username. For
example, the image file "picture.gif" stored in a subdirectory "images"
for the userid zabc12 would have the URL:
http://cscidbw.etsu.edu/zabc12/images/picture.gif
Good luck!
Developed by David Tarnoff exclusively for
use by students enrolled in ETSU's CSCI 1710.