This exercise has two purposes:
Four of the five ways that a JavaScript may be incorporated into an XHTML file involve entering the code directly into the XHTML file. Three of those four ways involve using the <script>...</script> tags that we discussed in class.
A browser executes the scripts in the order that that are encountered within the file: scripts in the head are executed first followed by the order they occur in the body, then finally any scripts after the body are executed. There is no limit to the number of scripts you are allowed to insert into a web page.
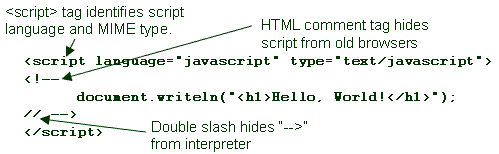
In the script tag, you need to tell the browser what kind of a script you will be inserting. By default, browsers expect JavaScript. It isn't a good idea, however, to rely in this. Therefore it is best practice to set it specifically. This is done by setting the attribute language in the script tag to "javascript". You may specify the version of JavaScript by appending it directly to the end (no spaces) of the word "javascript", e.g., "javascript1.3". The type attribute identifies the MIME type or protocol. In this case, setting it to "text/javascript" identifies the script not only as a text file, but how the text file is to be interpreted.
Once you've placed your script tags, you can insert the JavaScript code between the comment tags.
Any time a programmer is introduced to a new programming language, it is usually done through a program called "Hello, World!" All the program does is output the string "Hello, World!" to the output device. In our case, the output device is the browser window.
Begin by creating a generic HTML web page with a head and a body. You can do this in Notepad or by creating a blank web page in Dreamweaver. If you are using Dreamweaver, be sure to do these exercises in the code-view window. Make sure the page you've opened follows the XHTML template described in the first week of class.
<?xml version="1.0" encoding="ISO-8859-1"?>

<!DOCTYPE html PUBLIC "-//W3C//DTD XHTML 1.0 Strict//EN"

"http://www.w3.org/TR/xhtml1/DTD/xhtml1-strict.dtd">


<html xmlns="http://www.w3.org/1999/xhtml" xml:lang="en"
lang="en">

<head>

    <title>Hello, World! Exercise</title>

    <meta http-equiv="Content-Type" content="text/html; charset=ISO-8859-1"
/>

</head>

<body>


</body>

</html>
Now let's add some scripts to the page. We are going to add two scripts along with some HTML code to see how the page executes the scripts. Change your HTML page to look like the following:
<?xml version="1.0" encoding="ISO-8859-1"?>

  <!DOCTYPE html PUBLIC "-//W3C//DTD XHTML 1.0 Strict//EN"

  "http://www.w3.org/TR/xhtml1/DTD/xhtml1-strict.dtd">


  <html xmlns="http://www.w3.org/1999/xhtml" xml:lang="en"
  lang="en">

  <head>

      <title>Hello, World! Exercise</title>

      <meta http-equiv="Content-Type" content="text/html;
  charset=ISO-8859-1" />
    <script language="javascript"
  type="text/javascript">

      <!--

          document.writeln("<h1>Hello,
  World! (Source: script in head)</h1>");

      // -->
</script>
</head>

  <body>
    <h1>Hello, World! (Source:
  HTML at start of body)</h1>

      <script language="javascript" type="text/javascript">

      <!--

          document.writeln("<h1>Hello,
  World! (Source: script in body)</h1>");

      // -->
    </script>

      <h1>Hello, World! (Source: HTML at end of body)</h1>
 </body>

  </html>
    <script language="javascript" type="text/javascript">

      <!--

          document.writeln("<h1>Hello,
  World! (Source: script after body)</h1>");

      // -->
</script>
The object document has a method called writeln. When a browser encounters a writeln method within a script, it simply outputs the text argument to the browser followed by a carriage return. Load the code into a browser and see what the output looks like. It should look something like the following:

This should give you an idea of the order in which scripts are executed.
What if you have one script that you would like to use with multiple HTML pages, but you only want to edit it in one place? Or assume you want to keep your HTML code a bit cleaner without adding large blocks of script. The way to solve both of these dilemmas is to use an external script file.
Step 1: Create the script just as you would create the script between the script tags in the HTML file. An example is shown below:
 document.writeln("<h2 style=\"text-align: center;\">");

document.writeln("The source of this text is a script from an external file.");

document.writeln("</h2>");
Notice that the code doesn't have any HTML tags. It is purely the scripting language. Save this file under the file name "exer_02.js". Notice the .js file extension. All external JavaScript files must have this extension.
Step 2: Next, create the HTML file that will call this external JavaScript file. Just make a blank HTML file in your code editor again.
Step 3: To import the external file, we will use the script tags just as we did to embed the script files. The difference is that no script will be placed between the tags. Instead, we will use the script tag attribute src.
<?xml version="1.0" encoding="ISO-8859-1"?>

  <!DOCTYPE html PUBLIC "-//W3C//DTD XHTML 1.0 Strict//EN"

  "http://www.w3.org/TR/xhtml1/DTD/xhtml1-strict.dtd">


  <html xmlns="http://www.w3.org/1999/xhtml" xml:lang="en"
  lang="en">

  <head>

      <title>Hello, World! Exercise</title>

      <meta http-equiv="Content-Type" content="text/html;
  charset=ISO-8859-1" />
    <script language="javascript"
  type="text/javascript" src="exer_02.js">

      </script>
</head>

  <body>


  </body>

  </html>
Now that you've had an introduction to the basic format of a JavaScript program, we now need to cover some ways of having that code run as a result of an action on the web page. In our discussion of object oriented languages, we covered event handlers. Remember that events are things that happen to an object.
Your web page and the items in your web page have a number of events that can happen to them. For example, the actual loading of your web page is considered an event. This event is called onLoad. Hyperlinks/anchors also have a number of events that can happen to them. These include: onClick, onMouseOver, and onMouseOut. Each of these events can execute a script.
To associate an event with a particular element of your web page, we need to insert the event definition inside the tag for that element. For example, to have an event associated with a hyperlink, the event, such as onClick, must be placed in the <a> tag. An equal sign is then used to associate that event with a JavaScript operation. That operation may be a single command or it may be a JavaScript function. The text "javascript:" must be placed in front of the operation to identify it to the browser as a JavaScript command.
<a href="somesite.htm" onClick = "javascript:myfunction();">link</a>
The above code says that if a client clicks on the link, the JavaScript method "myfunction()" will be executed. Of course we need to write myfunction(), and the best place to put this is in the head of the document.
Let's begin by executing a JavaScript that is called by the event handler onLoad. Remember, onLoad is an event that occurs when a page is loaded. To associate an event with the page loading, it should be placed in the body tag.
In the body tag of a new blank page or a page from a previous exercise, add the code as it's shown below.
<body onLoad = "window.alert('This is the output
of my first JavaScript event handler!');">
This will call the JavaScript method "window.alert()" where "window" is the top object of the browser object model defining the window where the web page is loaded and "alert()" is a function that pops up a little window with the text between the parentheses displayed.
Note the use of quotation marks! The JavaScript function popUp(string) is in quotation marks because it is an attribute value for the attribute "onLoad". In addition, since the double quotes are used to identify the attribute values for the body tag, double quotes cannot be used for the string being passed to the popUp() function. Here, single quotes are used instead.
Now load your page in a browsers (or reload if you are using a page from an earlier exercise). The result should be a window like the one shown below.

When you load this file in your browser, notice whether the page itself loads before the pop-up window is displayed or after it is acknowledged. You can do this by putting some text into the body of the page and watching for when it is displayed.
The previous exercise embedded the JavaScript code or instruction directly into the tag. If you perform the same type of function with many events or if the function is far to large to embed into a tag, you should create your own function or method for the event handler to call.
There are three important things you need to include with a function: the function's name, any parameters passed to the function from the event handler, and the code to execute. The general format is shown below.
function functionName(passed parameters)

{

    your JavaScript code

}
Open your web page again. We are going to take the "window.alert()" function (which in itself is a function predefined for you in JavaScript) and put it into one of our own functions. Using the script tags, add the following function to the head of the web page.
    <script language="javascript"
  type="text/javascript">

      <!--

      function popUp()

      {

          window.alert('This is the output
  of my first JavaScript event handler!');

      }

      //-->

      </script>
Now, replace the onLoad event handler with the function call.
<body onLoad = "popUp();">
Did it work the same? If not, examine your code to see where the difference is.
Once again, any data that is between the parenthesis of a function (both when it is called and when it is defined) is data that is being passed to the function. For example, if a function doIt() is defined as shown below, then it would expect to receive two pieces of data when it was called.
function doIt(data1, data2)

{

    // do something with the data1 and data2

}
When you called the function, you would have to pass the parameters to it in the same order. For example, doIt would receive a 1 for data1 and a 24 for data2 in the case shown below.
onClick = doIt(1, 24);
For the next exercise, let's convert the function from exercise 4 to display a text string that is passed to it rather than display the same string every time. First, the passed parameter must be named. Do this by simply adding a variable name between the parenthesis of the function definition. In the case shown below, the variable name added was "message". Next, substitute the variable name as the parameter for the alert function. The function code should look like that shown below:
function popUp(message)

{

    window.alert(message);

}
Next, the onLoad event in the body tag must contain the string to be passed to the popUp() function. The body tag should now look like:
<body onLoad = "popUp('This is the output of my first JavaScript event handler!')">
One of the benifits of functions is that they can be called from anywhere. We can now add a link to our document that uses the onClick event to call our popUp function. Add the code shown below to your html file and see what happens when you click on the link that appears.
<p>By clicking <span onClick = "popUp('Span message.')">here</span>,
an alert box will appear.</p>
There are a number of ways to receive user input, but before we discuss any of them, let's create simple function that has different outcomes based on the value of a certain variable. We will eventually have the user modifying this variable, but for now, let's just create the function. Create a new XHTML file and insert the script shown below into the head.
    <script language="javascript" type="text/javascript">

    <!--

    var selected="1";


    function changeBGColor()

    {

        switch(selected)

        {

            case ("1"):

                document.body.style.backgroundColor="#99ffff";

                break;

            case ("2"):

                document.body.style.backgroundColor="#ff99ff";

                break;

            case ("3"):

                document.body.style.backgroundColor="#ffff99";

                break;

            default:

                document.body.style.backgroundColor="white";

                break;

        }

    }

    //-->

    </script>
All that this function does is change the background color of the page based on the user's input which will be found in the variable "selected". At this point, however, we don't have anything setting the variable, so it will always select the first case and set the document's background color to #99ffff.
Next, we need to come up with a way to call the function. The code below creates a button that when clicked calls the function changeBGColor(). Insert it into the body of your XHTML file.
<form name="userinput" id="userinput">

<input type="button" onClick = "changeBGColor()" value="Click here" />

</form>
Now let's get some user input. One of the easiest ways to get a value from a user is to use the prompt method that is part of the window object in the document object model. This method pops up a window much like the alert method with an area for user input. Its format is variable = window.prompt(message_string, default_input) where message_string is the string that will appear in the pop-up window and default_input is the default string that appears in the text input field. The method returns a string.
In your XHTML code, insert the following code immediately before the switch(selected) line in the JavaScript function.
selected = window.prompt("Select a background color:\n" +

    "0 (white), 1 (teal), 2 (lavender), or 3 (yellow)", "1" );
Save your file and view it in your browser.
Question: Why are double quotes placed around each of the values in the case statements?
Another way to send input to a JavaScript function is through a form input. We already have a form with our button, so all we need to do is add another form input that allows the user to select a background color. Add the following input code between your form tags:
<input type="radio" name="pickColor" id="pickColor"

    onClick="selected='0'" /> White<br />

<input type="radio" name="pickColor" id="pickColor"

    onClick="selected='1'" checked="checked" /> Teal<br />

<input type="radio" name="pickColor" id="pickColor"

    onClick="selected='2'" /> Lavender<br />

<input type="radio" name="pickColor" id="pickColor"

    onClick="selected='3'" /> Yellow<br />
So what does this code do? Well, first, it adds four radio buttons allowing the user a simple way to select their background color. Second, each of the radio buttons has an event onClick. When this event occurs, it changes the value of the globally declared variable "selected" which drives the background color change.
This code will not work, however, until we remove the line we added that uses the window.prompt method to get user input. Use the double slashes ("//") to comment out the lines. Run the code and see how it works.
The Web is plentiful with free, downloadable JavaScript. If you hit JavaScript Kit's scripts page, you will see what I mean. You now have the knowledge to incorporate any of the scripts you find on these download pages into your own HTML pages (remembering to obey copyright stuff, right?).
Developed by David Tarnoff for his students in CSCI 2910 at ETSU