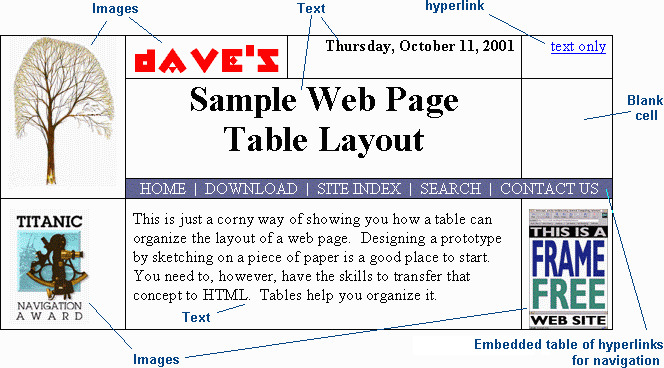
As we discussed in class, one of the uses of tables is to give a web site physical structure. This includes arranging items such as navigation tools, headings, and other "modules" of the page into an interface design that is consistent across all browsers.
As we will learn in the next few weeks, designing an HTML web page starts long before the first tag is typed into an editor. Designing a useable web site involves brainstorming on all that the site is to include, developing multiple "look-and-feel" schemes from which the customer can choose, prototyping these schemes, organizing the content, and developing the graphics and other support items.
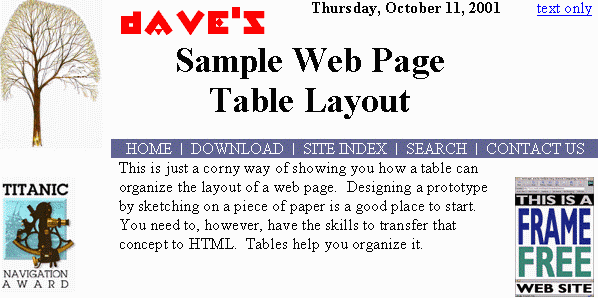
Before we get into design, however, I wanted to make sure that you could take a concept and turn it into HTML. As an example, I threw together a bad prototype to design for you.
|
|
The prototype consists of:
|
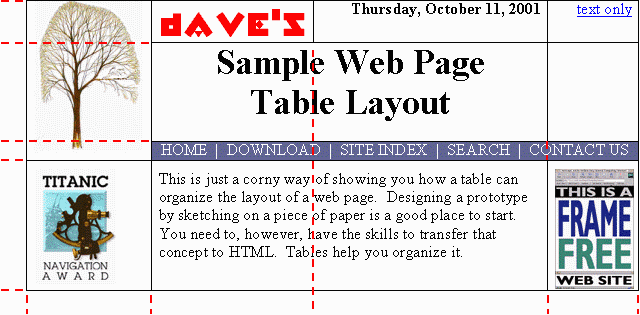
The first step in taking the components of a prototype design and arranging them into a table format is to extend the horizontal and vertical lines of each object in the table. I have done that for my prototype in the image below.
|
Therefore, the table will contain 4 rows and 4 columns, deliniated by the dashed red lines. Note that the navigation table is simply an embedded table with 5 columns and 1 row. Therefore, the components will be:
All of this results in the code below.
<table border="0">

    <tr>  <!-- Row 1>

        <td rowspan="3">

            <img src="tree.gif">

        </td>

        <td>

            <img src="dave.gif">

        </td>

        <td>

            Thursday, October 11, 2001

        </td>

        <td>

            <a href="text.htm">text only</a>

        </td>

    </tr>

    <tr>  <!-- Row 2>

        <td colspan="2">

            Sample Web Page<br>Table Layout

        </td>

        <td>


        </td>

    </tr>

    <tr>  <!-- Row 3>

        <td colspan="3">

            <table border="0" bgcolor="#336699">

                <tr>

                    <td>

                        <a href="home.htm">HOME</a>

                    </td>

                    <td>

                        <a href="download.htm">DOWNLOAD</a>

                    </td>

                    <td>

                        <a href="siteindx.htm">SITE INDEX</a>

                    </td>

                    <td>

                        <a href="search.htm">SEARCH</a>

                    </td>

                    <td>

                        <a href="contact.htm">CONTACT US</a>

                    </td>

                </tr>

            </table>

        </td>

    </tr>

    <tr>  <!-- Row 4>

        <td>

            <img src="titanic.gif">

        </td>

        <td colspan="2">

            This is just a corny..."cut to save space"...organize it.

        </td>

        <td>

            <img src="framfree.gif">

        </td>

    </tr>

</table>
Using these tools, you should be able to take any design you create on paper (which is, by the way, a wonderful way to create a prototype) and move it into HTML using tables.
Created by David Tarnoff for sections of CSCI 1710 and 5011 at ETSU