ENTC 2170—Assignment 2.2:
Procedures for Starting the Standard Drawing Border Block
The following procedures will help you get started in completing the tasks for Assignment 2.2. It is strongly suggested that, if your computer's screen resolution is sufficient, you move and resize both this browser window and the AutoCAD window so that both are visible. Otherwise, switch between AutoCAD, theis window, and, if necessary, the dimensioned drawing using the [ALT]-[Tab] keystroke combination.

 Start AutoCAD.
To begin a new drawing using inch (Imperial) units, choose from the main menu File->Open.
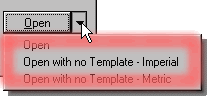
When the Select Template window appears, left click on the down arrow in the lower right corner by the word "Open" and
choose the "Open with no Template - Imperial" option with a left mouse click.
Start AutoCAD.
To begin a new drawing using inch (Imperial) units, choose from the main menu File->Open.
When the Select Template window appears, left click on the down arrow in the lower right corner by the word "Open" and
choose the "Open with no Template - Imperial" option with a left mouse click.
 Change the Format -> Point Style menu dialog box point style to something bigger than the default single little dot. Either of the styles shown to the right make good point representations. You may also want to set the relative size from 2 to 5% of the screen size so that the points remain clearly visible and a constant size no matter what zoom level you use.
- On the default (0) layer,
 , using the point tool
  , place two (2) points at the following absolute (ABS) X,Y coordinates. If you don't see anything on your screen after placing the first point, Zoom All drawing entities by pressing the [ Z ] key, the [Enter] key, the [ A ] key, and the [Enter] key again (e.g., Z [Enter] A [Enter]).
| Command |
Ref. |
X |
Y |
| 0,0 [Enter] |
ABS |
0 |
0 |
| .5,.5 [Enter] |
ABS |
.5 |
.5 |
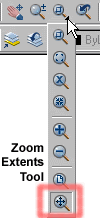 If both points are not visible, use the Zoom Extents command from the keyboard, the main drop-down menu ([Alt]+ V, Z, E), or the Zoom Extents tool (if visible).
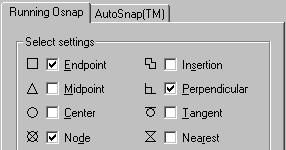 Using either the Osnap tool
  or the Tools -> Object Snap Settings... menu, activate the Endpoint, Node, and Perpendicular running object snap settings as shown to the right. For right now, deactivate all other snaps. Press the
  button to accept these new running snaps and return to the drawing.
- Using the layer control, switch from layer 0 to the Border (red) layer. If there is no layer named Border, use the layer tool
 to create a new layer, rename it Border, change the color of this new layer to red and then make it the active layer.
- Use the rectangle tool
 to create a rectangle from the absolute (ABS) point at (.5,.5) to a second point relative (REL) 10 inches in the X direction and 7.5 inches in the Y direction (i.e., use the @10,7.5 character string followed by pressing the [Enter] key in the command prompt to place the second point.) If required, use the Zoom All command to see the completed rectangle.
-
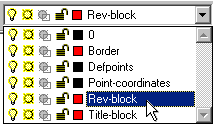 Switch to the red Rev-Block layer. If the layer does not exist, use the layer tool to create a new layer, name it Rev-Block, change the default color to red, and make this new layer the active layer.
- On the Rev-Block layer, and in the order listed, use either the point tool or the Draw->Point->Multiple Point menu option to place the following series of X,Y points that will be used to create the drawing template's revision block.
| Command or comment |
Ref. |
X |
Y |
| Snap - Upper R/H corner of border |
ABS |
10.5 |
8 |
@-5,-.25 [Enter]
Don't forget either the "@" or the minus signs! |
REL |
-5.0 |
-.25 |
| @0,-.25 [Enter] |
REL |
0 |
-.25 |
| @.5,0 [Enter] |
REL |
0.5 |
0 |
@2.75,0 [Enter]
(algebraically, 4.625 - 1.875 = 2.750) |
REL |
2.75 |
0 |
| @.875,0 [Enter] |
REL |
.875 |
0 |
| Did you notice that the lower line of points were sorta laid in backwards (i.e., dropped in from the left to the right although the drawing is dimensioned from right to left)? However, if you did things correctly, the final dimensional locations will be as specified. |
- Chose the line tool
 and, starting in the lower L/H corner of what will shortly become the revision block, draw the lines. To make sure that the lines are orthogonal (i.e., only horizontal or vertical), either use the Tools->Object Snap Settings...->Perpendicular or toggle on Ortho drawing mode by pressing the [F8] key as required. Remember to press the [Enter] key every time you wish to naturally break the line to create separate line segments.
- When the basic revision block line segments are complete, save the drawing.

- Use the Zoom Window keyboard command ( Z [Enter] A [Enter]) or the Zoom Window tool
 to zoom in on the revision block in the upper right hand corner of the drawing rectangle.
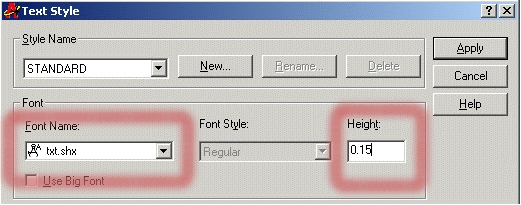 From the main menu, choose Format->Text Style to open the Text Style dialog box. In the Font Name section, choose the AutoCad font "Txt.shx" for the Font Name and set the Height to 0.15 as shown in the image to the right. When finished, press
  to accept these new default text settings and return to the drawing.
- Using the Text tool
 , inside the top box of the revision block somewhere just to the upper left of the center left click the left mouse button and, holding the left button down, drag down and to the right to create a text space for the block title. Release the mouse button.
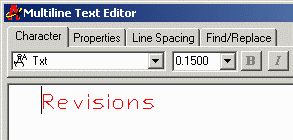 The Multiline Text Editor dialog box should immediately pop up. Make sure that the Character tab is active, that the font is set for "Txt", and that the height is set for 0.15 (i.e, matches what is shown to the right). In the editing space, type "Revisions" (no quotes) and press to accept.
- If necessary, the position of the "Revision" character string can be changed by clicking inside the word to select it. Then, from the main menu, choose Modify->Move. Click inside the word to choose a suitable base point or "handle". When the rectangular bounding box appears, reposition the string as desired. Left click the mouse to finalize the new position the text string. Readjust as required by repeating this step.
- From the main menu, again choose Format->Text Style to open the Text Style dialog box. Keep the Font set to "Txt" but change the font height to be somewhat smaller than the 0.15 used for the revision text string (say, 0.100). Press the button to accept this new default text settings and return to the drawing.
- Using the Text tool , create and place as shown in the drawing the following text strings: REV, Description, Date, and Approved. Try to center the text strings both vertically and horizontally. (Hint: draw a diagonal line in the box, set the Running Osnap to only Midpoint, set the Multiline Text Editor's Properties tab/Justification to "Middle Center, create the text strings outside the border, and then Modify->Move the text into position).
- When all of the text strings are correctly placed, save your work.
- Following the basic procedures listed above, on a red-colored layer named "Title-block" create the geometry to make the drawing's title block in the lower righthand corner of the drawing as specified and fill in the text strings as shiwn.
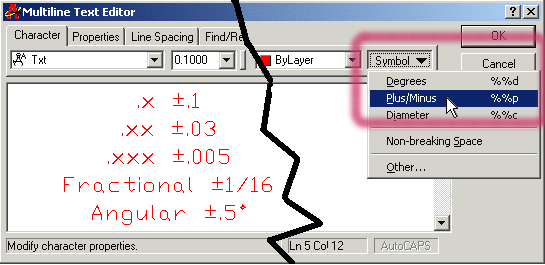
Two new things you'll need to use in the Tolerance block are the Plus/Minus [ ] and degree [°] symbols that can be found within the Multiline Text Editor dialog box by clicking the
  button on the "Character" tab (as shown below).
- Remember to save often while you work.
- Once you have completed the entire drawing template (border & both blocks), save it (ASSIGN22.DWG).
- While saying "There's no place like the home page," tap the heels of your shoes together three times, and click here to return to Assignment 2.2, step 5.

|

|

|
| Web site Copyright © 2000-2005 by
Bill Hemphill
All Rights Reserved. |
| Feb. 16, 2005 |
