|
|---|
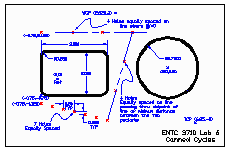
| In this laboratory assignment, you will use canned cycles and and loops to program either the
Anilam Crusader II or the Heidenhein TLC 155 controller to generate a pen plot of a
rectangular pocket, a circular pocket, and three lines of equally spaced holes.
For a larger, PDF version of the assignment, click
here or inside the image to the right. |
 |
For more information on the syntax used in initializing and calling canned cycles, see
Chapter 8 of the
Anilam Crusader II Programming & Operating Instructions or
Chapter 4 of the
Heidenhain Programming & Operating Instructions.
|
 |
| Programming Requirements: |
|---|
| Develop and run a commented CNC program per the following criteria: |
- Appropriate
setup and operational information in the header.
- Go to the Work Change Point (WCP) & stop (dwell).
- Go the the Tool Change Point.
- Load Tool #1 - (simulated ½" DIA 2-flute end mill).
- Initialize and call a canned cycle for a rectangular pocket as specified.
(Note: the specified dimensions are for the final milled
size of the pocket. Your center line tool path plot will be undersized by the
radius value of the specified tool.)
- Initialize and call a canned cycle for a circular pocket as specified. (See note in previous step.)
- Go the the Tool Change Point.
- Load Tool #2 - (simulated ¼" drill bit).
- Initialize a peck drill canned cycle.
- Starting at ABS point (X-0.75, Y-1.125), "drill" seven (7) equally spaced holes per the specified dimensions.
- Including the last hole drilled, "drill" a line of four (4) equally spaced holes per the specified criteria.
- Finally, drill a line of four equally spaced holes (including the last hole drilled in the previous step)
that would end at ABS point (X-0.75,Y2.125).
- Go to the Work Change Point (WCP) & stop (dwell).
|
 |
| Deliverables: |
|---|
- An appropriately commented CNC program.
- A plot of the assignment's CADD drawing. On the plot, identify
all programming points including the arc's start and stop points.
- A pen plot of the final program run. All team members need to sign the pen plot.
- Staple all sheets together and place into the class notebook by the due date.
|
 |
| Notes |
|---|
- With permission of the instructor, the team may revise the size, location,
and angular orientation of the pockets. Optimize the location of the shapes
to fit on a single sheet of letter-sized paper.
- Locate the CAD origin as shown. Suitably locate the machine's ABS (i.e., "world")
origin within the machine's physical work envelope to avoid operating near the
limits of travel.
- Consider using subroutines and loops to minimize coding requirements.
Three (3) extra points toward the final grade will be given to the team with the
"most compact and elegant" program.
|
|


