|
|---|
| In this laboratory assignment, you will use both subroutines and loops to program either the
Anilam Crusader II or the Heidenhein TLC 155 controller to generate multiple sets of the
geometries in developed in
Lab 2. (See:
Chapter 10 of the
Anilam Crusader II Pgrm & Op Instr or
Chapter 5 of the
Heidenhain Pgrm & Op Instr.)
|
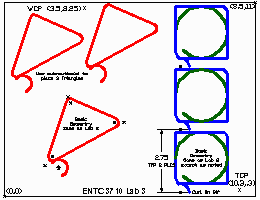 |
| For a larger, PDF version of the assignment, click
here or inside the image above. |
 |
| Programming Requirements: |
|---|
| Revise and extend the commented CNC program developed in
Lab #2 to the following items and generate three
(3) of each shape in the manner specified: |
- Appropriate header information (setup and operational information before the first '%' character).
Click here for an example.
- A subroutine to go to the Work Change Point (WCP) & stop (dwell).
- A subroutine to go the the Tool Change Point.
- A subroutine to create the triangle including a curl on & curl off.
This subroutine will be called three times.
- A subroutine to create the square including a curl on & curl off
- A subroutine to create the interior arc.
- The subroutines for the square and arc will be called inside one or more
loops.
|
|
| Deliverables: |
|---|
- An appropriately commented CNC program.
- A plot of the assignment's CADD drawing. On the plot, identify
all programming points including the arc's start and stop points.
- A pen plot of the final program run. All team members need to sign the pen plot.
- Staple all sheets together and place into the class notebook by the due date.
|
|
| Notes |
|---|
- If porting the program to the Bridgeport/Heidenhain TNC 155 controller:
- Download and use the
Heidenhain program template.
- Read the
Absolute/Incremental
Format Problem in
Chapter 3 of the
Bridgeport
Heidenhain CNC Mill Programming & Operating Instructions.
- Optimize the location of the shapes to fit on a single sheet of letter-sized paper.
- On your CAD drawing, include a 8½ x 11 rectangle to represent the paper.
- Locate the CAD origin near an appropriate corner of the paper.
- Locate the machines ABS (i.e., "world") origin at a suitable place so that all
movement is made within the machine's physical work envelope.
- If operating near the limits of travel, configure and call the subroutines &/or loops
to avoid overtravel.
- If necessary, recalculate and rewrite the point-to-point tool paths developed in
Lab #2 from absolute to incremental. To aid in the ABS to
INCR conversion process, you can use a spread sheet application
(see below) or you can use your CAD application's object
properties capability to fine the incremental ΔX & ΔY coordinate
values. To see an example of how this process would work, see the
Absolute to Incremental Cutter Path Conversion Using AutoCAD
web page.
|
|
|
Example Microsoft Excel spreadsheet
that converts
absolute X-Y & I-J values to incremental X-Y & I-J values. |

|